Working Portal Triangulation in UBE
Foundational portal placement geometry · Convergence, working zone, and angle considerations
#Why Triangulation Matters
Unilateral biportal endoscopic (UBE) spine surgery is defined by a single core principle: visualization and instrumentation are separated into two independent portals. The endoscope portal serves only as the viewing channel, while the working portal accommodates surgical instruments. The relationship between these two portals — specifically, how their trajectories converge at the target tissue — is the essence of triangulation.
When triangulation is not properly established, every subsequent step becomes more difficult. Instruments and the endoscope compete for the same anatomic space (instrument fighting), the working zone narrows, and the field of view is obscured by the instrument shaft. The technical difficulty of discectomy, decompression, or fusion increases disproportionately.
Conversely, when portal geometry is correct — when the endoscope and instrument converge at the target with an appropriate angle — the advantages of UBE are fully realized: a degree of visual freedom comparable to microscopic surgery, unrestricted use of conventional spinal instruments, and direct neural decompression. This article addresses the basic principles of triangulation and the practical steps of portal placement.

#Step 1. Surface Marking
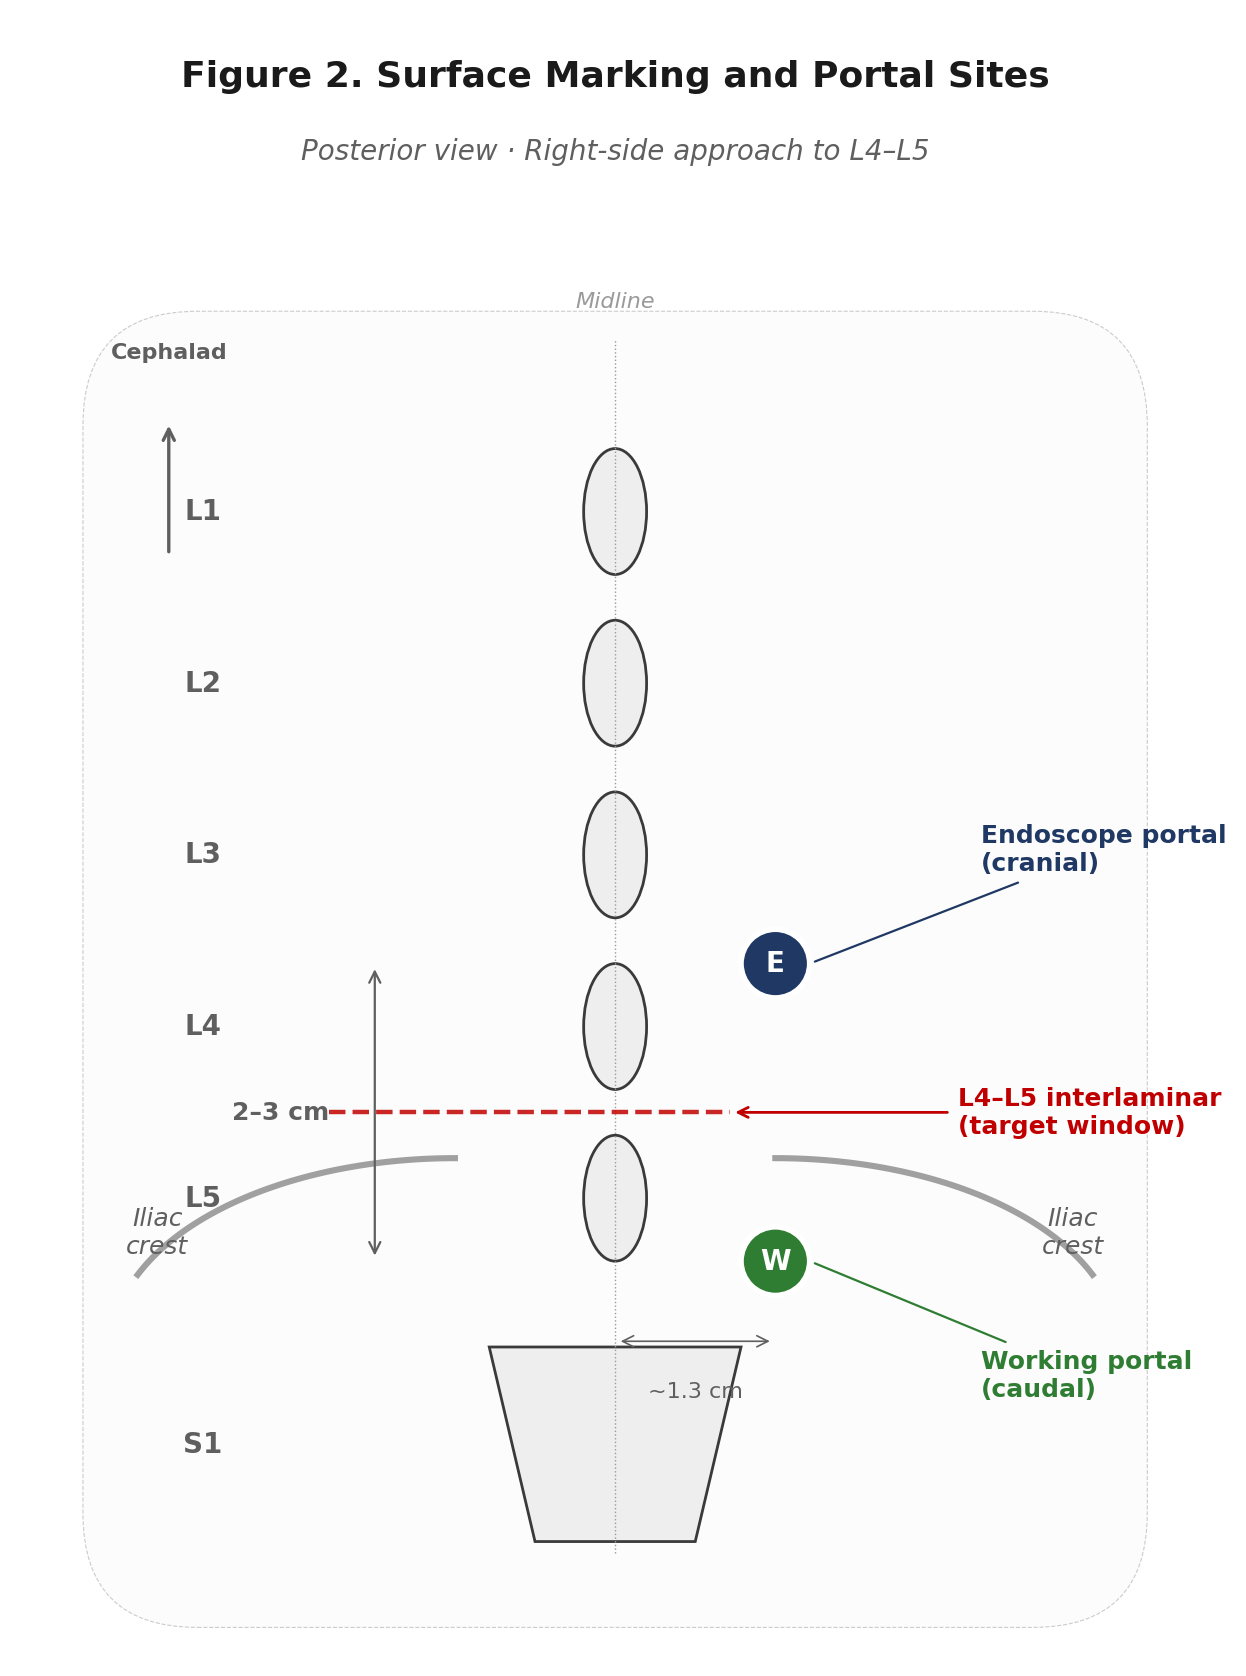
Portal placement begins, before any incision, with accurate surface marking under AP fluoroscopy. Using a right-side approach to L4–L5 as an example, the following landmarks are marked in sequence.
#Landmarks to mark
The three references below are marked in order; each subsequent decision is made relative to the previous landmark.
- Midline — Draw a vertical line connecting the spinous processes of L3, L4, and L5. Confirm under AP fluoroscopy that the spinous process is centered between the two pedicles before marking.
- Target interlaminar level — Identify the L4–L5 interlaminar window under fluoroscopy and mark it as a horizontal line. This is the target window, and all subsequent portal placement is determined in reference to this line.
- Iliac crest — At lower lumbar levels (especially L5–S1), the height of the iliac crest is a critical constraint on portal trajectory. Even at L4–L5, patients with a high-riding iliac crest may require modification of the working portal position, so it should be marked in advance.
#Determining portal positions
Both portals are placed on a vertical line approximately 1.3 cm lateral to the midline (the same lateral distance). The endoscope portal is positioned cranial to the target line, and the working portal caudal. The inter-portal distance is approximately 2–3 cm, the standard.
These distances are not absolute and should be adjusted to the patient's body habitus. In patients with thicker subcutaneous tissue, the working depth of instruments is longer, so portal distance is widened slightly (closer to 3 cm) to maintain the convergence angle. In leaner patients, a narrower distance (closer to 2 cm) provides adequate working zone.
#Step 2. Portal Placement and Triangulation
After skin marking is complete, 6–8 mm stab incisions are made at each portal site. Through the endoscope portal, an obturator is used to dock onto the lamina surface, then exchanged for the endoscope sheath. Through the working portal, the dilator and working sheath are sequentially advanced to reach the same anatomic target.
#Confirming convergence
Once both instruments reach the target, three things must be verified on the endoscope monitor.
- Convergence angle (θ) — Do the axes of the two instruments converge at approximately 30–45°? This angle determines the size of the working zone.
- Tip distance — Are the two instrument tips at the same depth? If one is deeper or shallower than the other, the instrument will not appear at the center of the endoscope view.
- Working zone clearance — Is there at least 1–2 cm of free working space in front of the endoscope tip? Within this space, the instrument can be freely manipulated.
If all three conditions are met, triangulation has been correctly established and the procedure can begin. If any is insufficient, do not advance the instrument — reposition the portal trajectory.
#Common Pitfalls
Three triangulation patterns are commonly observed in practice — one correct, and two error patterns that result from common psychological tendencies during portal placement.
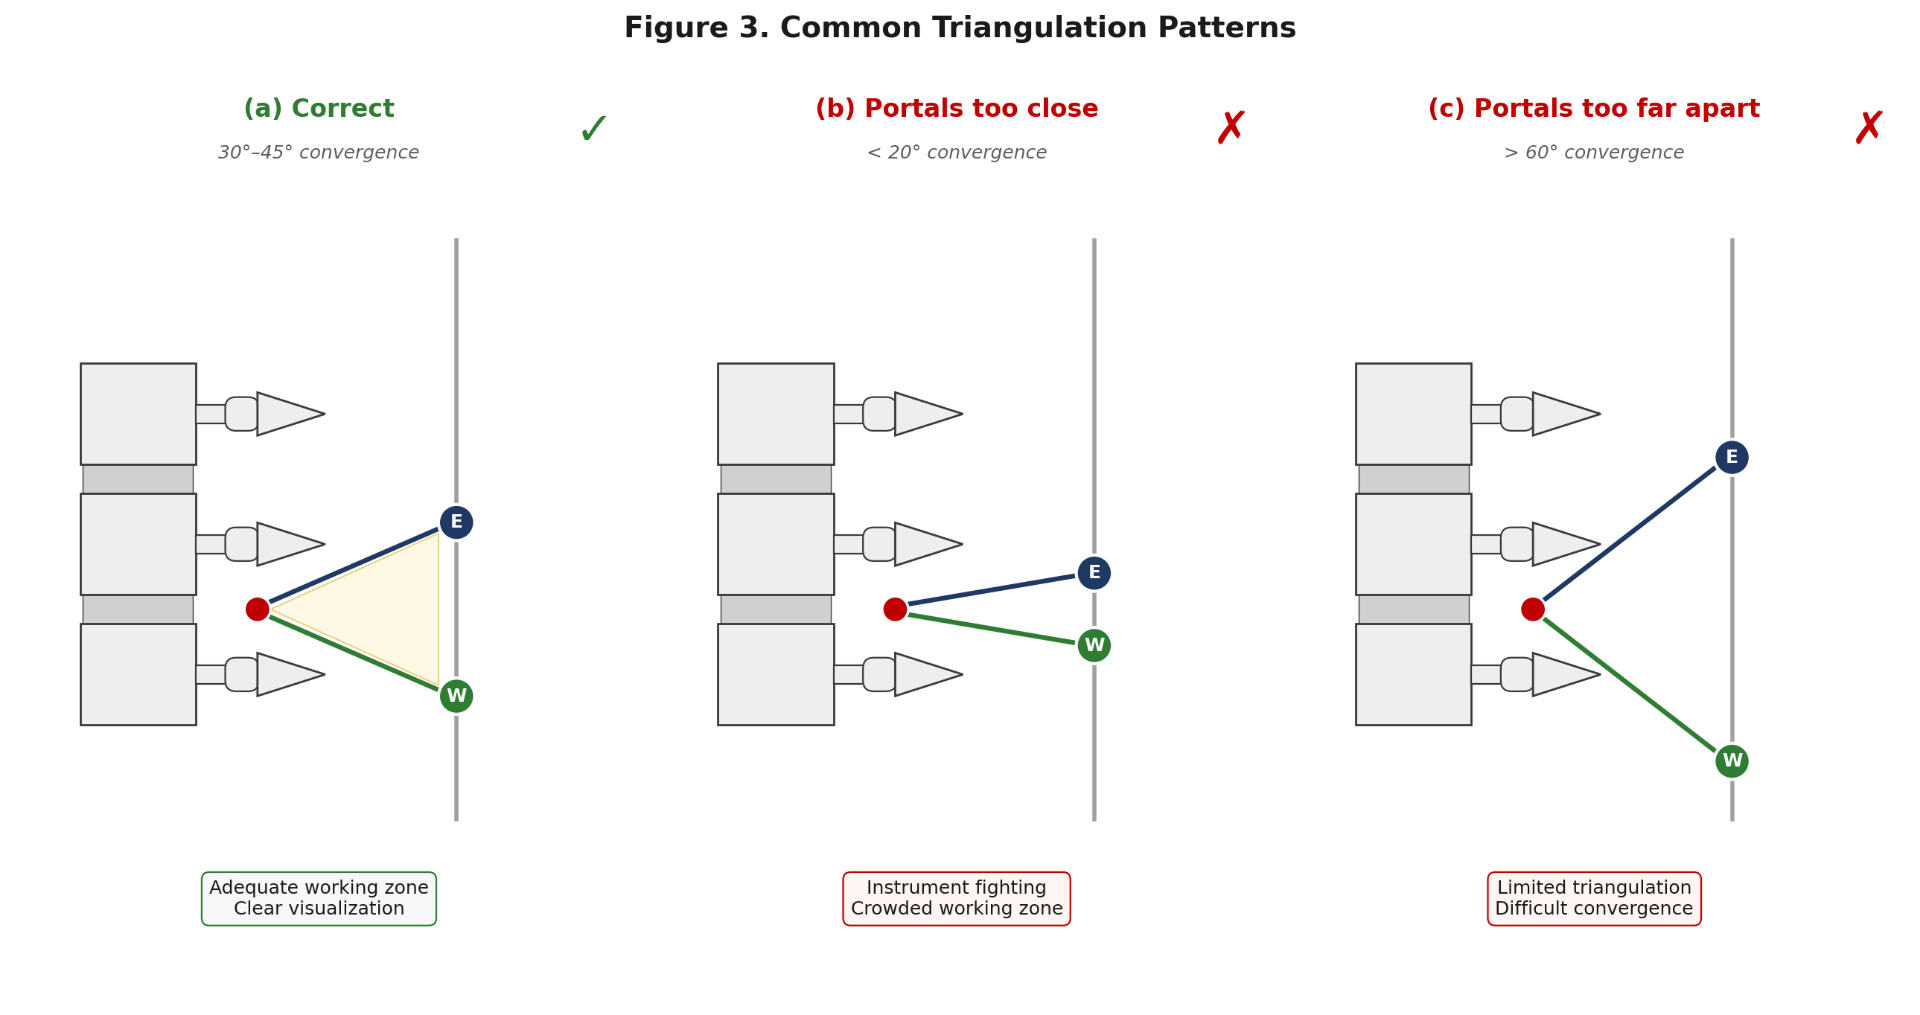
#Pattern (a): Correct
A convergence of 30–45° is the "goldilocks" range in which the working zone is deep enough while horizontal width remains adequate. A free space of 1–2 cm is reliably maintained in front of the endoscope tip, and the working instrument can freely access the lamina, ligamentum flavum, dural sac, and nerve root.
#Pattern (b): Portals too close
This is the pattern most commonly observed in junior surgeons. It results from the psychological tendency to place portals "safely" close together. The convergence angle becomes less than 20°, the working zone is narrow, and the instrument collides with the endoscope shaft.
Recognition: The shaft of the working instrument is constantly visible in the center of the endoscope view. The instrument tip is not visible, only the shaft; or moving the instrument causes the endoscope to move along with it. Recovery: Repositioning the working portal 5–10 mm caudally is faster than attempting to fine-tune from the current position.
#Pattern (c): Portals too far apart
This pattern arises as an overcorrection by surgeons who have experienced Pattern (b). When the convergence angle exceeds 60°, the two instruments struggle to meet effectively, and the working zone becomes shallow and laterally splayed. Depth control becomes difficult and the instrument tip frequently moves out of the visual field.
Recognition: The instrument tip frequently disappears at the edge of the endoscope view, or the instrument contacts the lamina too laterally. Recovery: Repositioning the portal is the principle, but in mild cases the instrument may be advanced deeper to operate at a deeper point where the two trajectories meet.
#Pearls for the First Cases
Triangulation is not a technique mastered once but a feel re-learned with each case. The "correct" portal position varies slightly with body habitus, level, and lesion location. The numbers presented in this article — 30–45° / 2–3 cm / 1.3 cm — are starting points; finding the variations that fit your hands is the path to mastery.
#Author Note
This article provides technical instruction on basic portal placement principles in unilateral biportal endoscopic (UBE) surgery and does not substitute for individual clinical judgment. The schematics are simplified for educational purposes; actual patient anatomy varies with lumbar lordosis, lamina morphology, and soft tissue thickness. All cited publications were verified through PubMed-indexed peer-reviewed journals.
- Heo DH, Son SK, Eum JH, Park CK. Fully endoscopic lumbar interbody fusion using a percutaneous unilateral biportal endoscopic technique: technical note and preliminary clinical results. Neurosurgical Focus. 2017;43(2):E8.
- Kim JY, Hong HJ, Kim HS, Heo DH, Choi SY, Kim KM, Lee DC, Park CK. Comparative analysis of uniportal and biportal endoscopic transforaminal lumbar interbody fusion in early learning stage: technical considerations and radiological outcomes. Journal of Minimally Invasive Spine Surgery and Technique. 2024;9(Suppl 1):S14–23.
- Heo DH, Park CK. Clinical results of percutaneous biportal endoscopic lumbar interbody fusion with application of enhanced recovery after surgery. Neurosurgical Focus. 2019;46(4):E18.
Hyun-Jin Hong, M.D., Department of Neurosurgery, Saegijun Hospital.